A few weeks ago, the Raspberry Pi 400 for my son’s birthday arrived in the mail. It was not easy to get one, as the availability is low on those single board computers. I had my eyes on the pine64 series too, but for a 9yo, i figured the pi400 design would be a better fit.
So the idea is to provide him with an easy access to information. Access to knowledge is fundamental. But I want to help him not spend two hours a day on youtube or worst.
Since he is pretty young to have full access, I want to set up the Pi in a certain way:
-
Only access to a few websites we, as his educators, control:
-
The list can grow as he browses the web and asks for more access.
-
-
Time limitation: only a few hours a week. He can manage his time the way he wants.
-
no root (admin) access
Hardware
Pi 400 comes in a bundle with a mouse, an SD card with pre-installed OS, and cables. All it needs now is an HDMI monitor. Frankly, it looks great.

After playing with it for a couple of hours, the overall sensation is pretty good. Browsing the web is fast. The OS is Raspbian 11, bullseye Debian.
Software
Time Control
That ended up being way more straightforward than I initially thought it would. Just install: timekpr-next
Then configure it from the GUI. Simple as that.
sudo gpasswd -a fridim timekpr
# relaunch X session
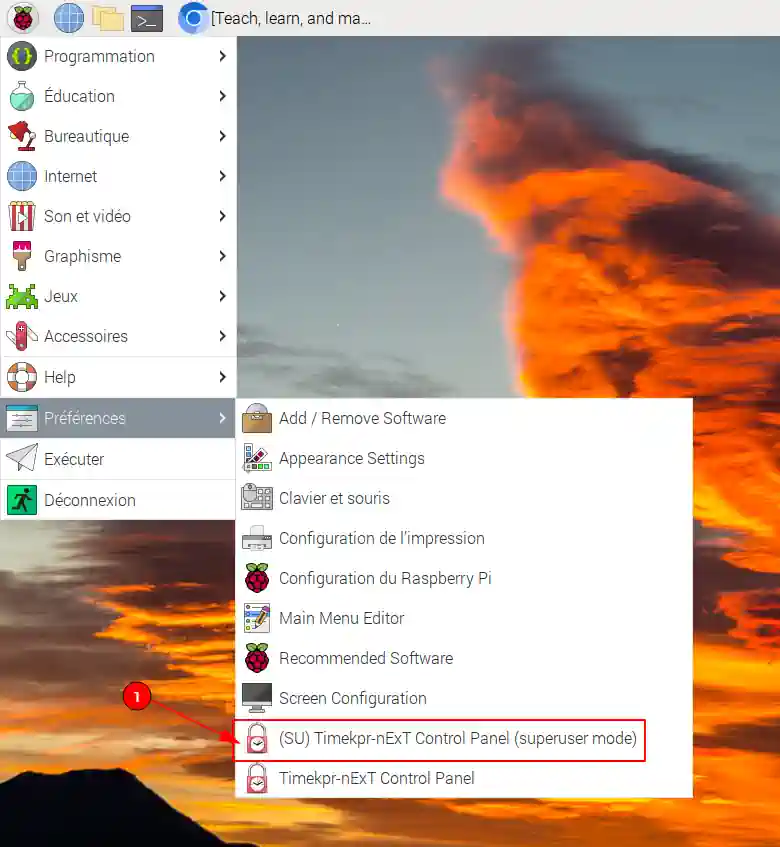
| 1 | Run the timekpra as admin |
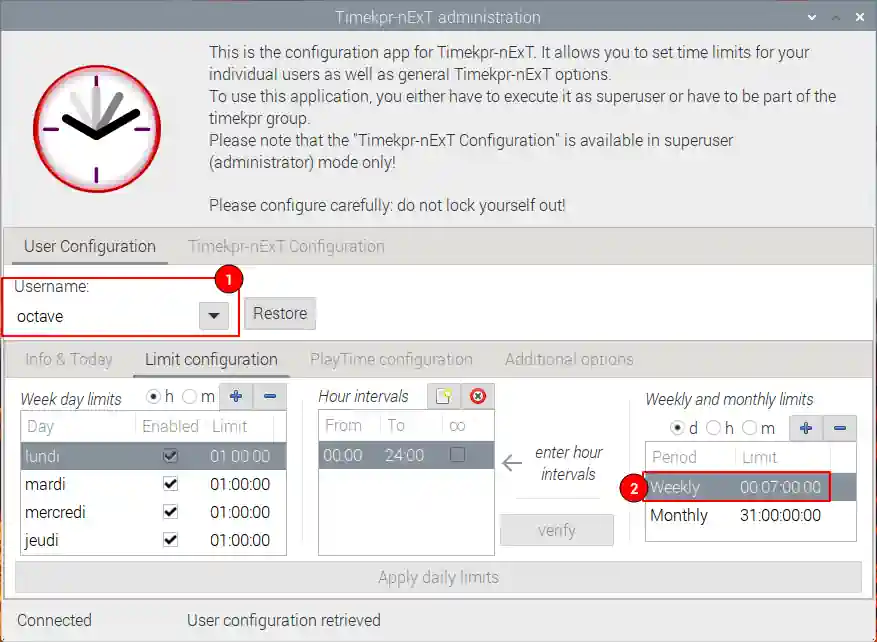
| 1 | Select user |
| 2 | Define number of hours per week |
Add more time
If you want to punctually add time, you can do it in the client UI or using the CLI tool:
# replace 'kid' with the appropriate login name
timekpra --settimeleft 'kid' '=' 3600   # reset to 1h
timekpra --settimeleft 'kid' '+' 600    # add 10m
Filtering Web access
To filter web access, set up TinyProxy on one of the local network machines. For me, it’s an Orange Pi 4 LTS. I think it’s easier if the proxy lives on a different machine than the child’s computer. But it could be possible to bind it there, maybe a bit complex. I’m using TinyProxy because it’s enough for my case, but you could use squid.
TinyProxy, on a separate host
/etc/tinyproxy/tinyproxy.confUser tinyproxy Group tinyproxy Port 8888 Timeout 600 DefaultErrorFile "/usr/share/tinyproxy/default.html" (1) StatFile "/usr/share/tinyproxy/stats.html" LogFile "/var/log/tinyproxy/tinyproxy.log" LogLevel Info PidFile "/run/tinyproxy/tinyproxy.pid" MaxClients 100 Allow 127.0.0.1 Allow ::1 Allow 192.168.0.0/16 (2) ViaProxyName "tinyproxy" Filter "/etc/tinyproxy/filter" FilterDefaultDeny Yes ConnectPort 443 ConnectPort 563
| 1 | You can customize the HTML page |
| 2 | Allow machines from the local network |
/etc/tinyproxy/filtereasylist.to$ ublockorigin\.github\.io$ ublockorigin\.pages\.dev$ malware-filter\.pages\.dev$ malware-filter\.gitlab\.io$ curbengh\.github\.io$ filters\.adtidy\.org$ download\.zerotier\.com$ .*\.raspberrypi\.org$ mirrors\.ircam\.fr$ distrib-coffee\.ipsl\.jussieu\.fr$ wikipedia\.org$ .*\.wikipedia\.org$ wikimedia\.org$ .*\.wikimedia\.org$ google\.com$ .*\.google\.com$ duckduckgo\.com$ easylist-downloads\.adblockplus\.org$ googleapis\.com$ .*\.googleapis\.com$
Complete maintained version is available here.
#!/bin/env -S ansible-playbook -i opi,
- hosts: opi
  become: true
  gather_facts: false
  vars_prompt:
    - name: domain_exp
      prompt: What is the domain Expression you want to allow?
      private: false
  tasks:
    - name: Add domain to /etc/tinyproxy/filter
      lineinfile:
        path: /etc/tinyproxy/filter
        line: "{{ domain_exp }}"

    - name: Restart tinyproxy
      service:
        name: tinyproxy
        state: restarted
Client applications
Configure the browsers and all the client applications on the child’s computer. The best is to add the HTTP proxy environments variable in /etc/profile.
/etc/profile.d/proxy.sh/etc/profile.d/proxy.sh
export http_proxy=http://192.168.1.21:8888
export https_proxy=${http_proxy}
export ftp_proxy=${http_proxy}
export rsync_proxy=${http_proxy}
export no_proxy="localhost,127.0.0.1,localaddress,.localdomain.com"We could stop here. But let’s say the kid is smart enought to change environment variables or configure the browser not to use a proxy.
We can block all HTTP(S) traffic except to the tinyproxy.
To achieve that, I picked firehol, but any local firewall would do the trick.
/etc/firehol/firehol.confversion 6
server_zerotier_ports="udp/9993"
client_zerotier_ports="any"
server_tinyproxy_ports="tcp/8888"
client_tinyproxy_ports="any"
interface any world
# Allow incoming SSH
server ssh accept
# Allow incoming/outgoing traffic for zerotier
server zerotier accept
client zerotier accept
# allow ping
server ping accept
client ping accept
# allow NTP and DNS
client ntp accept
client dns accept
# Allow outgoing traffic only to the proxy
client4 tinyproxy accept dst 192.168.1.21
# test with:
firehol /etc/firehol/firehol.conf

# when happy:
systemctl start firehol
systemctl enable firehol
Client roaming
Instead of the local network address, simply use the Zerotier IP address of the machine hosting the proxy.
/etc/profile.d/proxy.shexport http_proxy=http://192.168.X.X:8888 # zerotier/etc/firehol/firehol.confinterface any world client4 tinyproxy accept dst 192.168.X.X # zerotier
Notifications
By default notification are broken in Bullseye-based raspberrypi OS. Make sure to run the notification-daemon:
apt install libnotify-bin notify-osd notification-daemon

echo "@/usr/lib/notification-daemon/notification-daemon" >> /etc/xdg/lxsession/LXDE-pi/autostart
TODO
-
Pretty and comprehensive HTML page when a website is not authorized. Fix when it’s HTTPS